EQ is one of the most important tools in music production. We use it to shape sounds, remove unnecessary frequencies and help all the elements of a track work together.
However, it is also one of the easiest tools to use incorrectly.
Many producers start out following advice such as always cutting below certain frequencies, removing bass from every instrument or applying particular boosts for more presence. Although some of these techniques can be useful, applying them automatically does not guarantee a better mix.
In my experience, EQ is not simply about removing frequencies. It is about understanding the role of each sound and finding a way for it to coexist with everything else.
To explain this, I want to share a personal way of visualising music production that I have used for years.
The mix as a box full of pieces
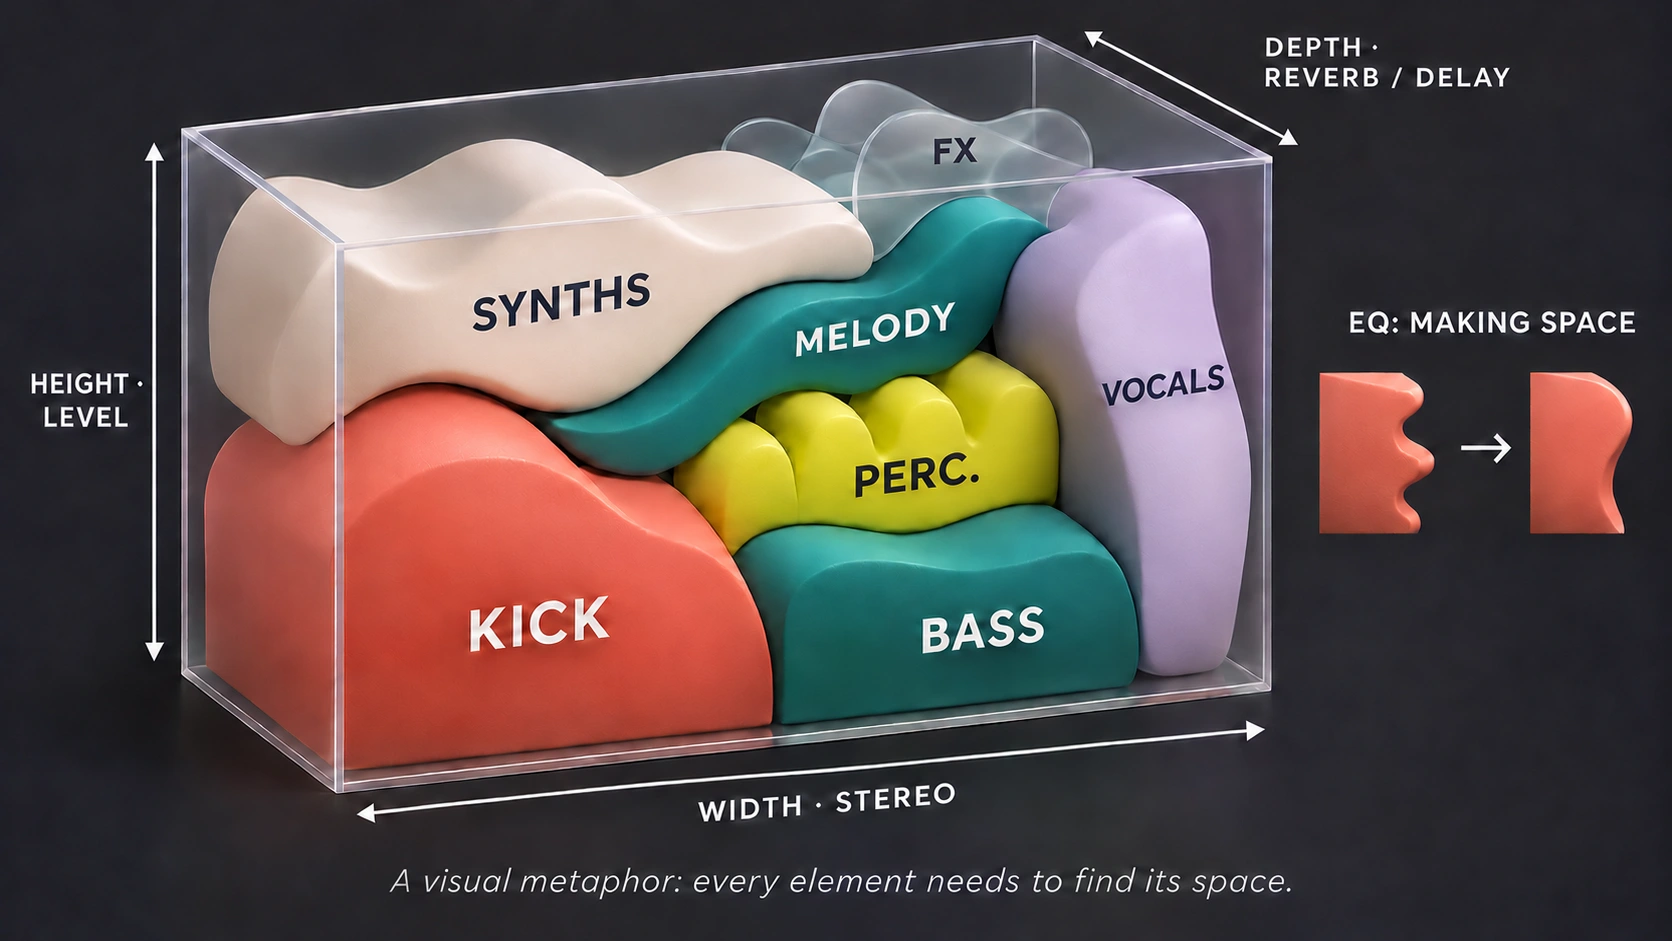
Imagine music production as a box. That box represents the space available to build our mix. It has a width, which we can relate to the stereo field; a height, which we can associate with the volume of the sounds; and a depth related to the sense of space created by effects such as reverb or delay, among others.
Inside, we need to place every piece of our production: the kick, bass, percussion, synths, melodies, vocals and effects.
Each piece has a shape and takes up a certain amount of space. We need to arrange them properly so they fit inside the box and we can put the lid on.
The problem starts when we try to fit all these pieces in without considering how they fit together. This is where EQ comes in.
For me, using an EQ is like taking each piece and polishing it, removing or adjusting whatever stops it from fitting properly alongside the others. We do not want to destroy its original shape. We want to adapt it so it works as part of the whole.
Although this is a metaphor rather than an exact physical representation of audio, it helps explain one of the foundations of a good mix: every element needs to find its space.
What exactly is EQ?
Equalisation, or EQ, is a process that lets us change the level of particular frequencies in an audio signal.
With an equaliser, we can cut or boost different regions of the frequency spectrum to change a sound's tonal balance.
A young, healthy human ear can hear roughly from 20 Hz to 20,000 Hz, although this range varies between people and changes with age.
Within that spectrum, we find different regions associated with particular sonic characteristics.
The lowest frequencies provide depth and weight. The midrange contains much of the body and character of many instruments, while the highs contribute definition, brightness and a sense of air.
These descriptions are only guidelines. A single instrument can occupy several parts of the spectrum, and its character depends on how its energy is distributed across them.
EQ lets us influence that distribution, but we should remember something important: we do not need every instrument to sound spectacular on its own. We need them to work together.
The main types of EQ filters
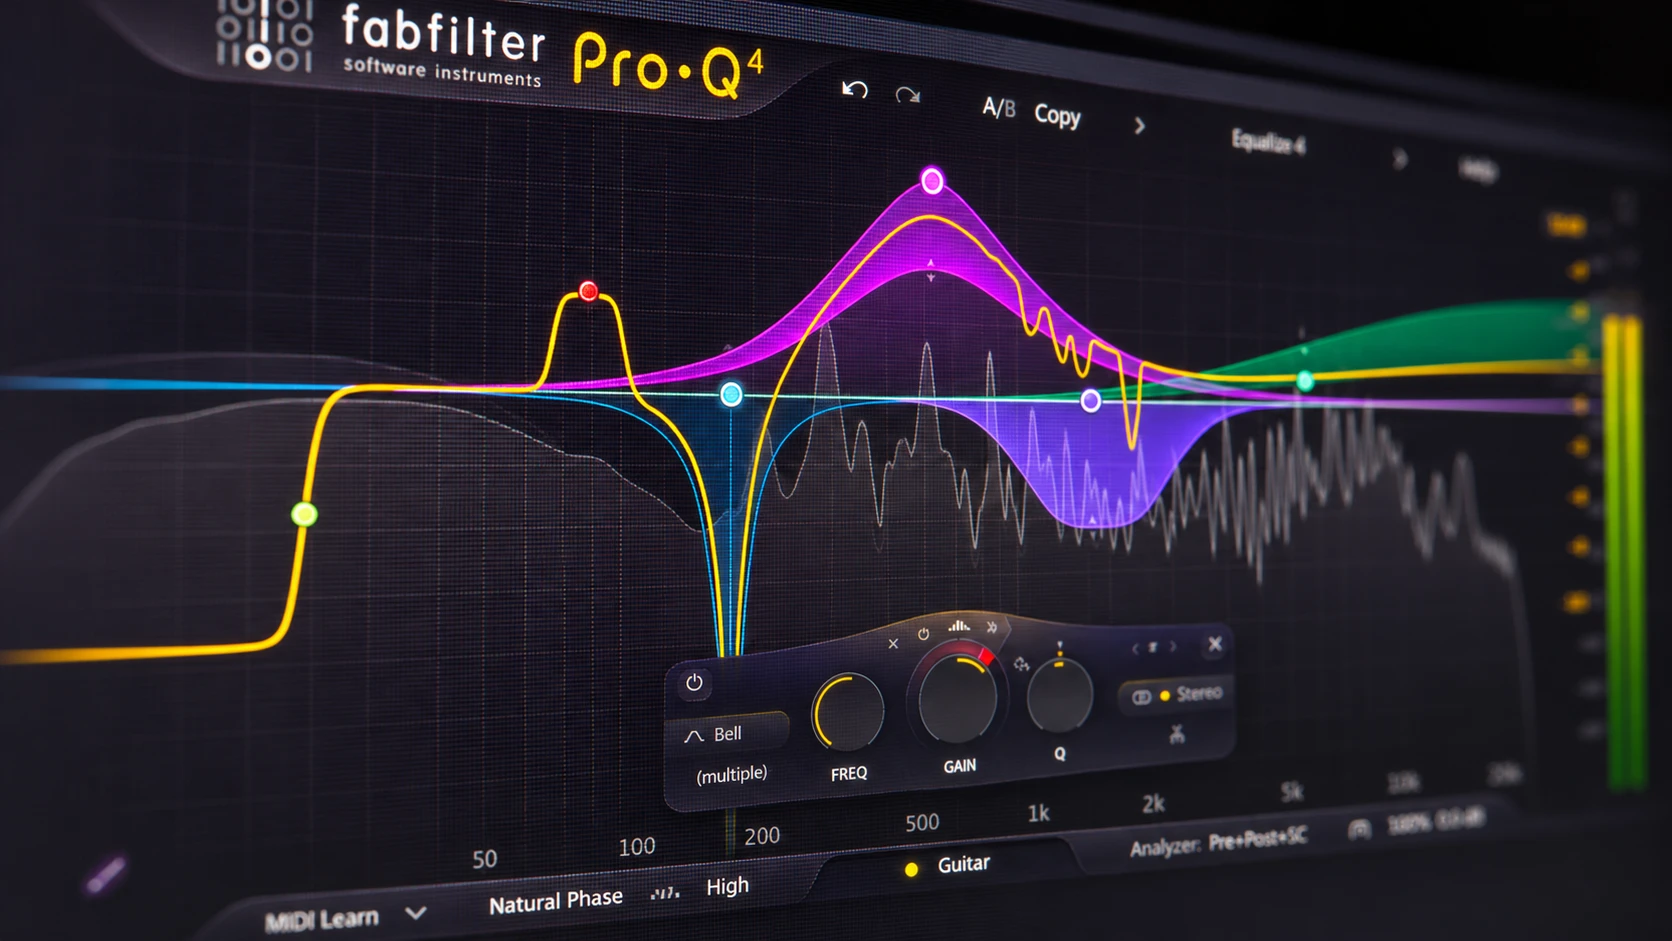
Before looking at practical applications, it is worth briefly covering the most common filters found in any professional equaliser today. Personally, my favourite is without a doubt FabFilter Pro-Q 4.
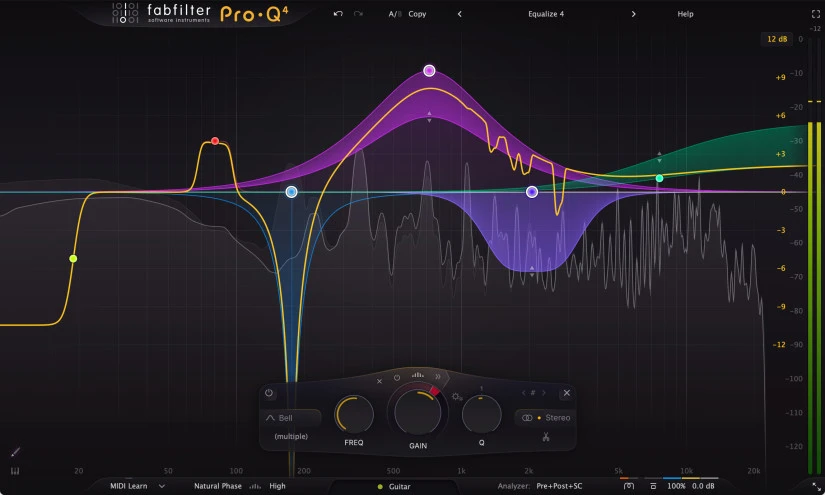
Pictured: FabFilter Pro-Q 4.
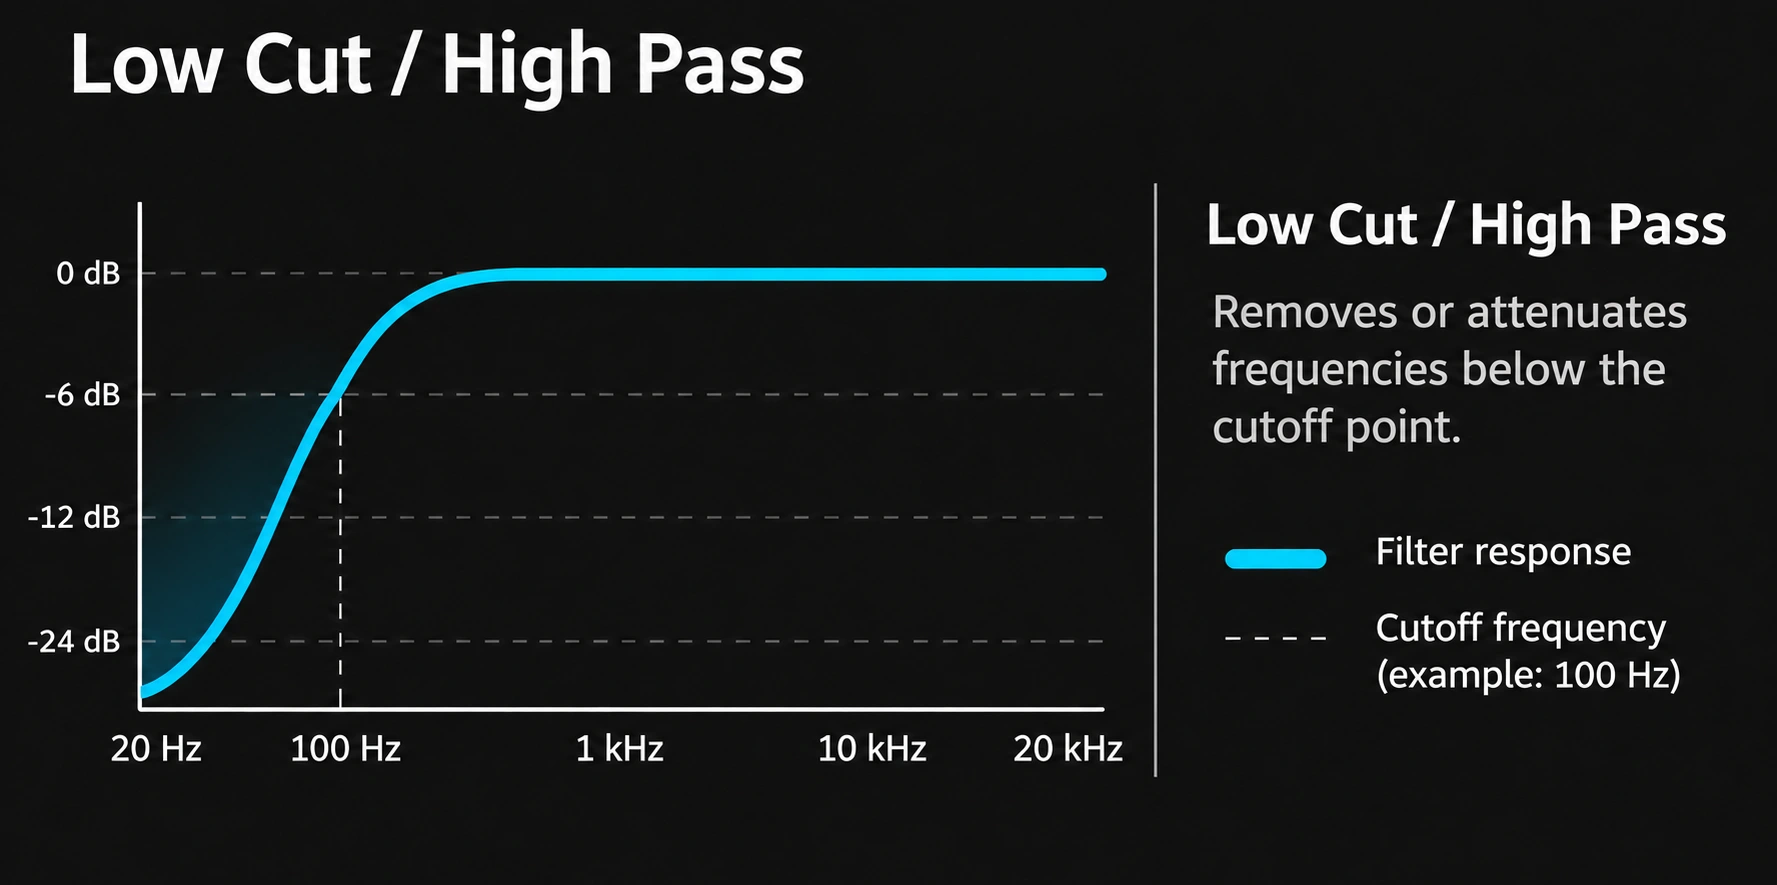
Low cut or high-pass
A high-pass filter progressively attenuates frequencies below a cutoff frequency.
It is particularly useful when we want to reduce low-frequency content that does not contribute positively to a sound or interferes with other elements.
We can control its cutoff frequency and, in many equalisers, the slope at which the lower frequencies are attenuated.
High cut or low-pass
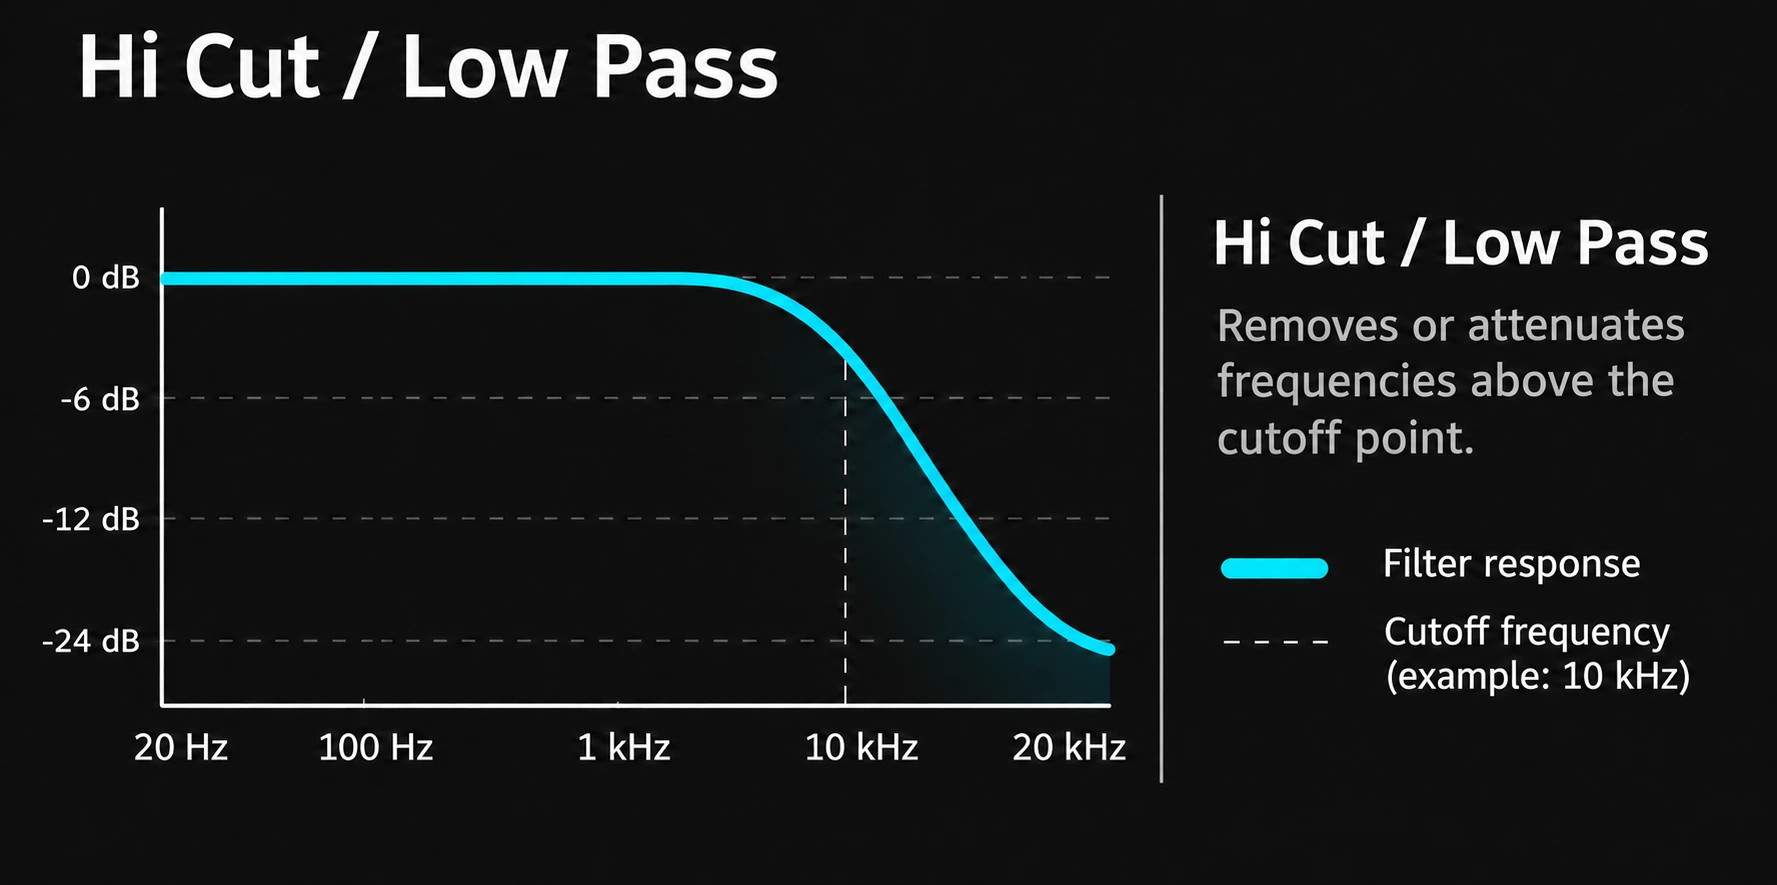
This works in the opposite way. It attenuates frequencies above a certain point.
It can help control excessive highs, reduce high-frequency noise or create darker sounds.
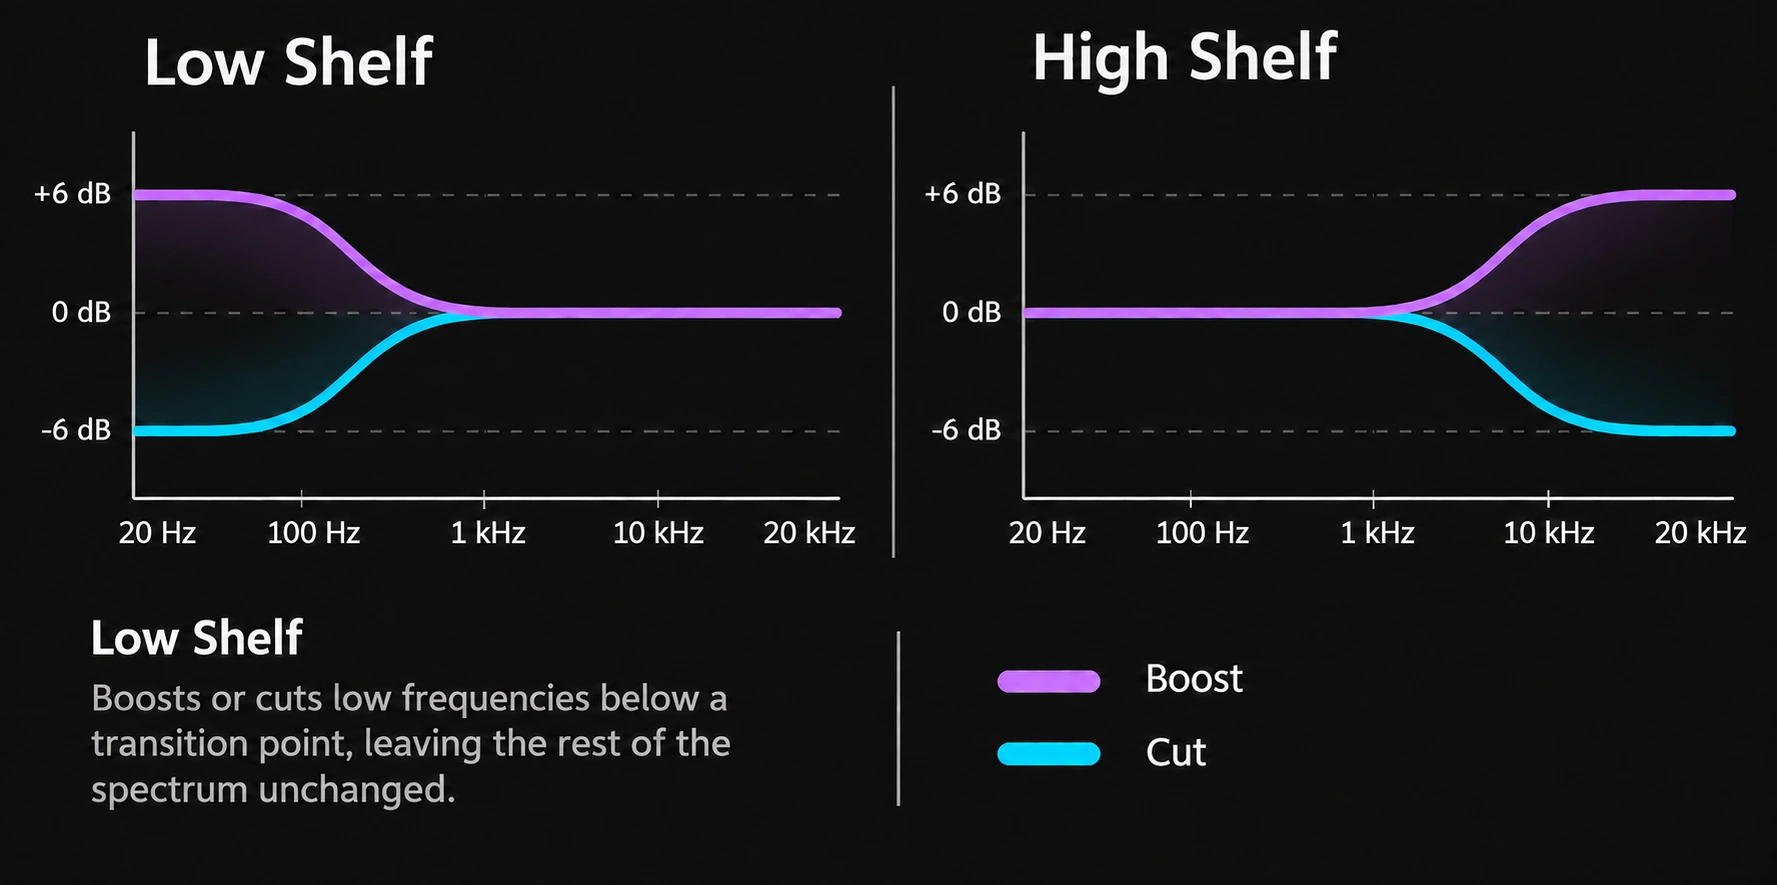
Low shelf and high shelf
Shelf filters let us gradually boost or cut a region of frequencies.
For example, a low shelf can reduce the bass by several decibels without the progressively increasing attenuation towards lower frequencies characteristic of a high-pass filter.
This can be useful when we want to retain some of an instrument's body.
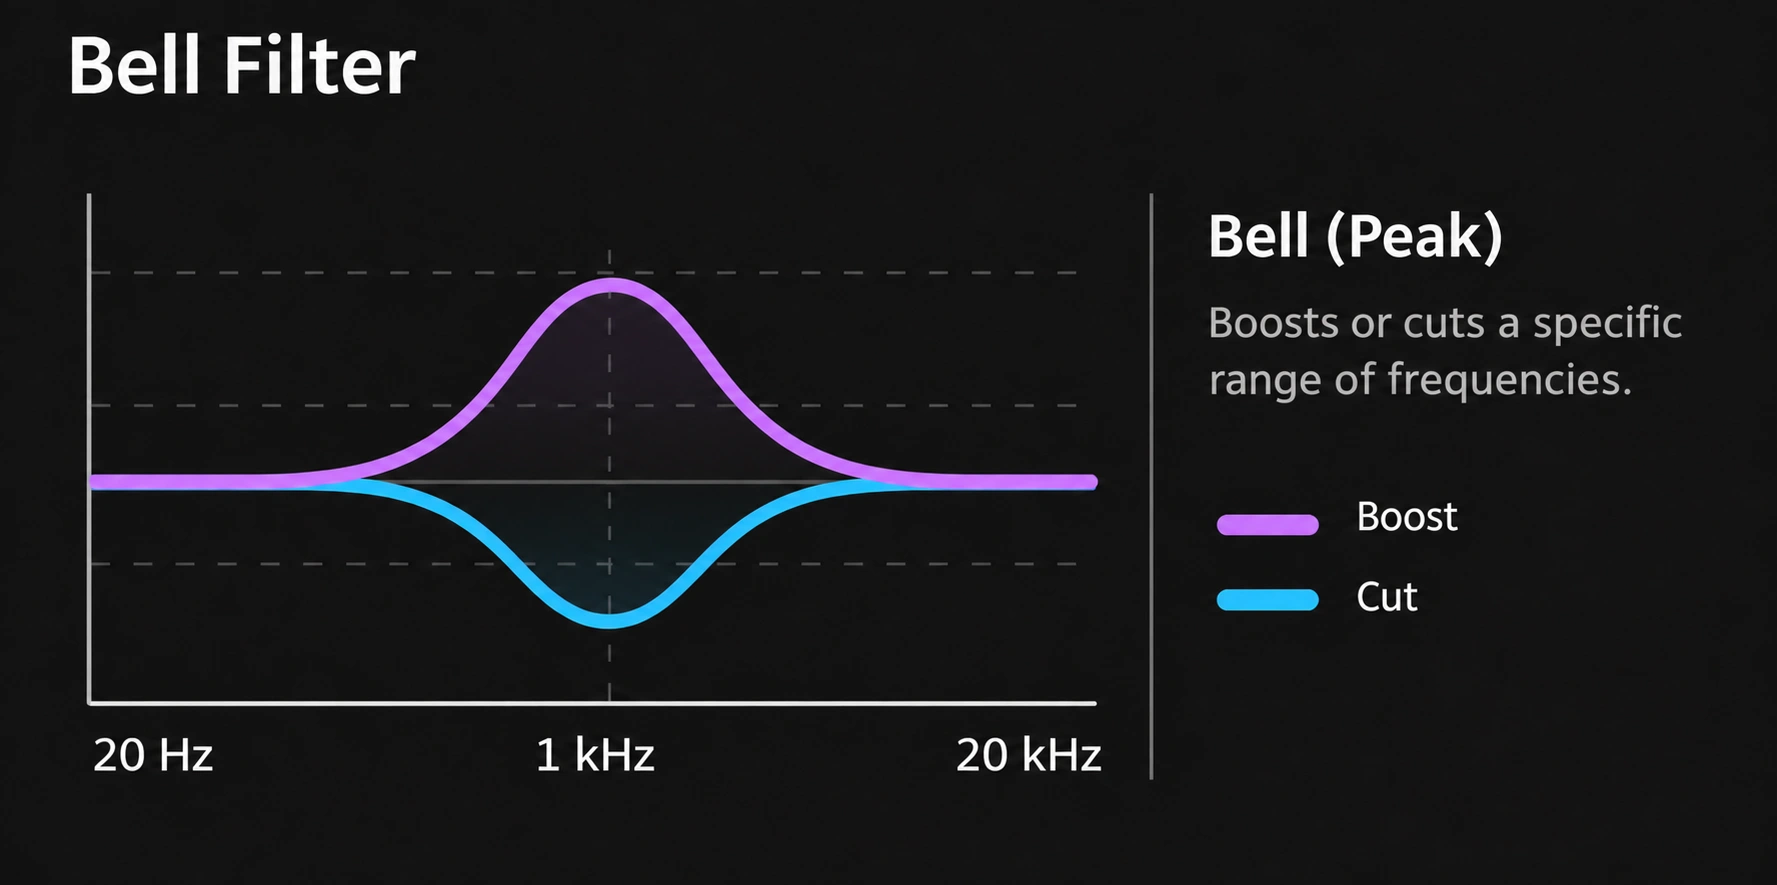
Bell or peak
This is one of the most widely used filters in mixing.
It lets us boost or cut a particular region of the spectrum around a centre frequency.
The Q parameter controls the width of that region. A narrow bandwidth affects a smaller area, while a wider bandwidth allows broader adjustments.
All these filters have different uses, but none is automatically better than another.
What matters is knowing what we want to achieve.
Removing unnecessary frequencies: a bass example
One of the clearest examples of how I use EQ is when I work with several bass layers.
We might have one layer dedicated mainly to sub-bass and another that adds texture, harmonics, character and presence higher up the spectrum.
Imagine our first layer already provides all the weight we need in the lowest frequencies.
The second layer has a different role. We want it to add harmonic richness and help the bass remain audible, but we do not necessarily need it to reproduce the same amount of sub-bass.
If both layers contain too much energy in that region, we can run into balance and overlap problems.
In this situation, I tend to use EQ to reduce the low frequencies in the second layer.
Depending on the sound, I might use a low cut or a low shelf.
The aim is not to remove frequencies for the sake of it, but to let each layer do its job.
When combining several low-frequency sounds, we also need to pay attention to their phase relationship. Two layers can reinforce or partially cancel each other, and EQ is not always the right solution to that problem.
Low cut vs low shelf: which is better?
Low cut vs low shelf: which is better?
Progressively attenuates frequencies below the cutoff.
Reduces a low-frequency region while retaining an adjustable amount of energy.
This is a subject on which producers have different opinions.
Some recommend avoiding high-pass filters because they can change a sound's character, particularly when using very steep slopes or excessive cuts.
There is some truth to that.
Filters can change the phase response and alter an instrument's tonal balance. Depending on their settings, they can also affect transient shape or the way a sound interacts with other layers.
However, this does not mean we should avoid low cuts or that low shelves are always a better alternative.
Shelf filters can introduce phase changes too. A high-pass filter does not change the musical note a synthesiser is playing, although it can change its harmonic content and our perception of its timbre.
Personally, I use both.
For me, the question is not which is better, but understanding when we need each one.
If a layer's role is to add texture to an already well-defined sub-bass, I will probably use a low cut to reduce the frequencies I do not need.
But if I want to keep some body and simply reduce the sound's low-frequency presence, I may use a low shelf.
How do I decide how far to cut?
Mainly by listening.
I usually adjust the filter gradually until I hear the sound start to lose some of its character. At that point, I back off slightly and check how it works in the mix.
I am not especially concerned about whether the cutoff is at 80 Hz, 120 Hz or 200 Hz. What matters is whether the result makes sense for that instrument and the production as a whole.
Of course, judging low frequencies properly requires experience, a suitable monitoring system and reasonable acoustic conditions.
Spectrum analysers are fantastic tools for understanding what is happening, but they should not replace our ability to listen.
My philosophy is simple: do not EQ by numbers or absolute rules. Listen to what your mix actually needs.
Making space between instruments with EQ
Another of EQ's most important uses is helping different instruments coexist without constantly competing for the same frequencies.
Imagine we have two synths with different roles.
One is our main lead, playing the melody. The other is a pad or supporting layer that provides harmony and depth.
Although their musical roles differ, they can occupy similar regions of the spectrum.
When this happens, we may experience a phenomenon called frequency masking.
Essentially, one sound's energy makes certain parts of another sound harder to hear clearly.
In these situations, we do not always need to turn up the instrument we want to highlight.
Sometimes a small cut in a particular region of the supporting sound is enough to make the main sound clearer.
For example, we can reduce a little midrange in our pad to leave more space for the lead.
Interestingly, even though we have not turned the lead up, it can seem more present.
That is because we have reduced competition between the two instruments.
It is important to understand that the lead's actual level has not increased. Its relative presence within the mix has improved.
This is one of EQ's great advantages: we can improve separation without constantly relying on moving faders up and down.
Not every clash needs EQ, though. Sometimes changing an instrument's octave, adjusting the arrangement or volume, or choosing a different sound is more effective.
Should we EQ an instrument in solo?
This is another point I consider essential.
When working on a synth, it is easy to fall into the trap of EQing until it sounds spectacular on its own.
We want plenty of body, powerful lows, defined mids and bright highs.
Then we bring in the other instruments and discover that our impressive sound takes up too much space.
That is why one of my most important recommendations is to EQ while listening to the whole mix.
A sound that seems too thin in solo can work perfectly alongside the bass, percussion and other synths.
The reverse can also happen: a seemingly balanced sound can cause problems when combined with other elements.
This does not mean we should never use the solo button.
Listening to an instrument in isolation can help us locate resonances, identify noise or understand what is happening in particular frequency regions.
But the final decision should be made by hearing how it works within the production.
After all, nobody will listen to our instruments individually when they play the finished track.
The danger of removing too many frequencies
One of the most common mistakes I see among newer producers is excessive use of high-pass filters.
There is an idea that we should remove the low frequencies from almost every instrument to achieve a clean mix.
Although controlling the lows is important, applying this indiscriminately can have the opposite effect.
If we remove too much low-frequency information from synths, percussion and atmospheric elements, the mix can lose body, depth and naturalness.
Sometimes the result sounds too thin or overly bright.
We also need to be careful with very steep cuts. Depending on the filter and the material, they can introduce phase changes or alter transient behaviour.
My recommendation is to avoid automatic cuts.
We do not need to remove everything below a particular frequency simply because we read it in a tutorial.
We need to identify which information is useful and which is causing problems.
The same applies to boosts.
Boosting certain frequencies can help an instrument stand out, but too many boosts across different channels can build up energy and make the mix harder to balance.
Good EQ is not about using lots of filters. It is about using the filters you need.
The analyser shows you the frequencies. Your ears tell you what to do with them.
Modern equalisers offer increasingly detailed spectrum analysers.
We can visualise energy distribution, find resonances and even compare the frequency content of different instruments.
These are extremely useful tools.
However, there is a risk of mixing more with our eyes than our ears.
An EQ curve can look aggressive while producing a relatively small audible change. The opposite can also happen: an apparently subtle adjustment can change a sound's character considerably.
Although I use visual tools for support, I believe developing the ability to listen and recognise problems is essential.
This takes time and practice.
We should also remember that our listening system influences us. If our monitors or headphones do not reproduce certain frequencies properly, we can make poor decisions.
Using reference tracks, checking mixes on different systems and getting to know our monitors can help develop that judgement.
The aim is not to stop looking at the analyser.
The aim is to let our eyes help us understand what we hear, rather than make decisions for us.
Conclusion: EQ is about learning to listen
EQ is fundamental to any music production, but it should not become an automatic process.
For me, it remains one of the best ways to make all the pieces of a mix fit together.
Returning to the opening metaphor, we can imagine our production as a box full of instruments that need to find their place.
EQ lets us polish those pieces, reduce what causes clashes and highlight the characteristics we actually need.
But every sound has a role, and we do not always need to change it.
A low cut is not inherently better than a low shelf. An aggressive cut does not guarantee a cleaner mix. An instrument that sounds spectacular in solo will not necessarily work better in the track.
The real skill is recognising what each element needs and making decisions based on what we hear.
Ultimately, the best EQ is not the one with the prettiest curve or the most filters.
It is the one that helps all the instruments work together without losing their identity.